
Hey fellow aquarium enthusiasts! If you’re anything like me, you know how crucial it is to maintain a stable water level and keep the surface of your tank clean. This is especially true for reef tanks, where keeping the salinity stable is key. That’s why I’ve designed an overflow box accessory for the AquaClear 70 hang-on-back filter, and I’m thrilled to share the design drawings as .svg cut files for your laser printer with you for free! In this post, I’ll walk you through the benefits, the materials you’ll need, and the step-by-step assembly instructions.
Why You Need an Overflow Box
First off, let’s talk about why an overflow box is a game-changer for your aquarium:
- Surface Skimming: This handy tool removes debris and organic matter from the water surface, keeping your tank looking pristine and promoting oxygen exchange.
- Consistent Water Level: When paired with an auto top-off system, it helps maintain a stable water level. This is crucial for keeping salinity levels steady in reef tanks, which is a big deal for the health of your corals and other marine life.
What You’ll Need
Before you get started, here’s a list of materials and tools you’ll need:
- Materials:
- Acrylic sheets (3mm or 1/8″ thickness recommended)
- IPS Weld-on #16 or similar
- Strong reef safe magnets make sure to remove any adhesive! (for attaching the overflow box to the tank)
- Tools:
- Laser cutter you may be able to find one that you can use locally through a makerspace, library, high school or university.
- Sandpaper or file
- Razor blade
- Clamps (not necessary if you can find creative ways to hold the parts together ie rubber bands, tape and/or blocks of wood)
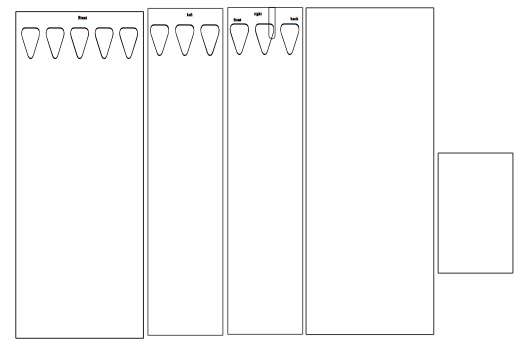
Get the Free Drawings
You can download the design files for the overflow box here. The files are available in .svg format, so they should work with most laser cutters.
Let’s Build It: Step-by-Step Assembly Instructions
Detailed instructions with images to come! Please check back soon!
Preparation
- Cut Out Parts: Using the free download cut out the sides of the overflow box. I recommend using a laser cutter but you could use a router if you wanted. You may be able to use a laser cutter for free at a local makerspace, library, or university. I used 1/8″ black acrylic sheets that I ordered on amazon. Make sure the acrylic sheets will fit in your laser cutter if using one.
- Rough up the Edges: After cutting the pieces, make sure all edges are roughed up a little using sandpaper or a file. It’ll help the pieces bond together better. You want to try to remove any “burnt” acrylic to provide a fresh clean place for the acrylic weld to bond.
- Clean the Acrylic: Remove the protective paper from the acrylic sheets. Give all the pieces a good wipe to remove any dust or residue.
Assembly
- Assemble the Base and Sides:
- Align the side panels with the base and bond them using acrylic weld on #16. Use clamps or heavy objects to hold the pieces in place until the adhesive sets. It might help to put a piece of wood or some other object that’s about the right size into the box to act as a support. The sides sit next to the bottom, not on top of it. Please see assembly pictures.
- Attach the Front and Back Panels:
- Secure the front and back panels to the sides and base. Ensure the edges are properly aligned. The front and back panels overlap the edges of the sides and bottom piece (see images).
- Cure Time:
- Allow the assembly to cure completely according to the adhesive manufacturer’s instructions.
- Attach the Magnets:
- Bond the magnets to the inside of the overflow box using reef safe adhesive. Make sure they are securely attached and properly aligned for a strong hold on the tank.
Installation
- Attach to Filter:
- Connect the overflow box to your AquaClear 70 filter. Make sure all connections are secure to prevent leaks.
- Use Magnets for Attachment:
- Use the strong magnets to attach the overflow box to the back of your tank. This method provides a secure yet easily removable attachment.
- Test with Water:
- Before placing it in your aquarium, test the setup with water to ensure there are no leaks and everything functions correctly.
- Add ATO and Adjust
- Insert the auto top off device inside the box at an appropriate height. Ensure the height is high enough that the hob filter gets plenty of water and does not suck up air.
Maintenance Tips
- Regular Cleaning: Periodically clean the overflow box to prevent clogging and maintain optimal performance.
- Inspect Seals: Check the bonded joints occasionally to ensure they remain secure.
Join the Community and Get Support
I’d love to hear about your experiences and any modifications you make. You can subscribe to get updates when I make new posts. If you have any questions or need assistance, feel free to reach out to me via email at support@example.com.
Visual Aids
(coming soon)
For a clearer understanding of the assembly process, check out our photo gallery and step-by-step diagrams below. Additionally, watch our video tutorial here. (coming soon)
Legal and Safety Disclaimer
Please handle laser cutters, adhesives, and magnets with care, following all safety guidelines. Note that users assemble and use the overflow box at their own risk.
By following this guide, you’ll enhance your aquarium setup with a DIY overflow box, ensuring cleaner water and stable salinity levels. Download the free drawings today and start your project!


Leave a comment